Cherry Cheesecake Lush: Easy No-Bake Dessert Recipe
ADVERTISEMENT
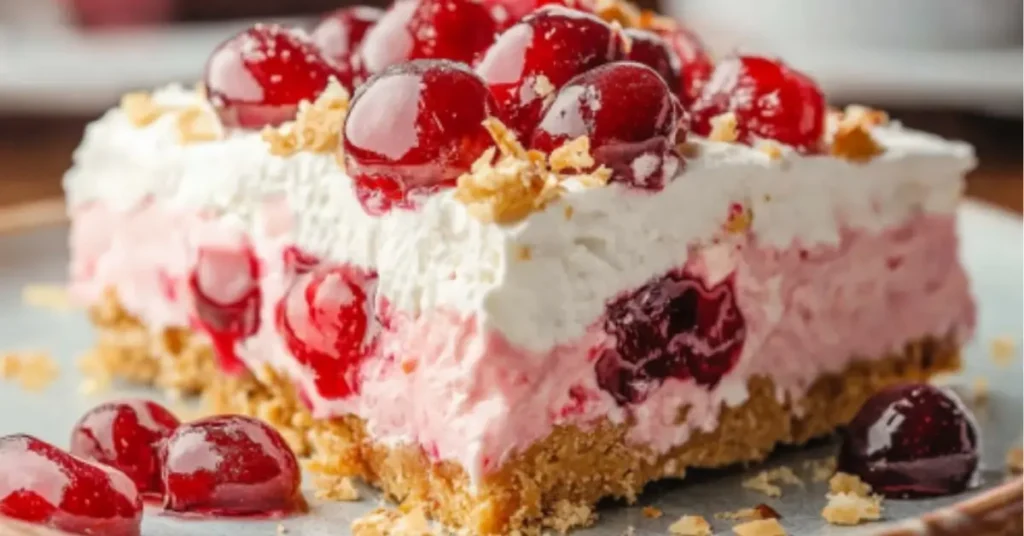
A decadent cherry cheesecake lush dessert featuring layers of creamy cheesecake filling, buttery graham cracker crust, and vibrant red cherry topping, beautifully presented in a clear glass dish with a sprinkle of crushed nuts and fresh cherries for garnish, set against a soft pastel background.
Looking for a no-bake dessert that will wow your guests? The Cherry Cheesecake Lush is your go-to. It's a mix of creamy layers and a tangy cherry topping. This dessert is easy to make and tastes fantastic.
This dessert is quick to prepare—it takes just 15 minutes and uses only 6 ingredients. You'll get a beautiful cherry cheesecake that looks like it's from a bakery. It's great for summer parties, potlucks, or a quick dessert fix.
Table of Contents
Key Takeaways
- A no-bake dessert that's super easy to make
- Requires only 15 minutes of preparation time
- Serves 12 people perfectly
- Can be prepared ahead of time
- Versatile recipe with potential flavor variations
What Makes Cherry Cheesecake Lush Special
Imagine a dessert that combines creamy layers, crunchy texture, and vibrant flavors. Welcome to Cherry Cheesecake Lush. This fantastic party dessert is a hit at gatherings and celebrations. It offers a fun twist on traditional cheesecake.
The Perfect Party Dessert
Cherry Cheesecake Lush is a top choice for crowd-pleasing treats. Its layered design makes it easy to serve at big gatherings, and its eye-catching appearance always grabs attention. The dessert can be made beforehand, which is excellent for busy hosts.
- Serves multiple people
- Can be made ahead of time
- Visually appealing presentation
Origins of Lush Desserts
Lush desserts, also known as dessert lasagna, are based on traditional icebox cakes. These layered treats were a creative way to mix different textures and flavors without baking. Cherry Cheesecake Lush is a modern take on this classic idea.
ADVERTISEMENT
A decadent cherry cheesecake is a lush dessert elegantly presented at a vibrant summer party. Layers of creamy cheesecake, graham cracker crust, and bright red cherries are surrounded by colorful party decorations and fresh mint leaves, with soft natural lighting enhancing its delicious appeal.
Why Choose a No-Bake Recipe
No-bake desserts like this one are a game-changer. You can make a delicious dessert without using the oven. This is perfect for summer or when you want to keep the kitchen cool. The recipe is easy, making it great for bakers of all levels.
"A dessert that's both impressive and effortless—that's the magic of Cherry Cheesecake Lush!"
This dessert shows that you don't need complex techniques to create culinary magic. Its simple preparation and tasty layers make it a standout.
Essential Ingredients and Substitutions
This is a visually appealing arrangement of cherry cheesecake ingredients, featuring a vibrant display of fresh cherries, a block of cream cheese, a graham cracker crust, powdered sugar, and a bowl of whipped cream. A small container of vanilla extract and a few sprigs of mint for garnish are included, all set against a rustic wooden background.
Making the perfect cherry cheesecake lush starts with knowing your ingredients. This dessert needs a well-balanced mix of ingredients, which together create a delicious treat.
Here are the main ingredients you'll need:
- 1 package (14 ounces) of Golden Oreos
- ⅓ cup melted salted butter
- 8 ounces softened cream cheese
- ¾ cup white sugar
- 16 ounces thawed whipped topping
- 2 small boxes of cheesecake pudding mix
- 3 cups whole milk
- 2 large cans of cherry pie filling
Substituting ingredients can help if you have dietary needs or limited pantry space. Here are some ideas:
- Gluten-free option: Use gluten-free vanilla cookies instead of Golden Oreos
- Try almond or oat milk instead of whole milk for a dairy-free option
- Choose sugar-free pudding mix for a dessert with less sugar
- Make your own whipped cream instead of using store-bought topping
"No bake desserts like this cherry cheesecake are perfect for warm weather gatherings!"
Remember, when substituting ingredients, keep the amounts similar. This helps keep the texture and taste of your cherry cheesecake lush just right.
Step-by-Step Preparation Guide
Making a delicious Cherry Cheesecake Lush needs careful steps. This guide will help you make a dessert that will wow your guests.
Creating the Perfect Crust
Your crust is the base of this tasty treat. First, gather these essential ingredients:
- 2 ½ cups vanilla wafer crumbs
- ½ cup melted butter
- ¼ cup chopped pecans (optional)
Mix the wafer crumbs with melted butter. Press it firmly into a 9x13-inch baking dish. Make sure it's even and compact to hold the cheesecake layers.
Mixing the Cheesecake Layer
Layering is key to creating a lush texture. For the cream cheese mix, you'll need:
- 8 ounces softened cream cheese
- 1 cup powdered sugar
- 8 ounces of whipped topping
Beat the cream cheese until smooth. Slowly add the powdered sugar. Then, gently mix in the whipped topping to keep it light and airy.
Assembly and Layering Tips
How you assemble it makes all the difference. Follow these steps closely:
- Chill the crust for 10 minutes
- Spread the cream cheese mixture evenly
- Add pudding layer
- Top with cherry pie filling
- Sprinkle with additional chopped pecans
"The secret to a perfect Cherry Cheesecake Lush is patience and precise layering." - Dessert Experts
Refrigerate it for at least 4 hours. This will allow the flavors to mix and the layers to set. Your Cherry Cheesecake Lush is now ready to impress!
Cherry Cheesecake Lush Storage Tips
Storing your Cherry Cheesecake Lush right is key to maintaining its perfect taste and texture. Knowing how long it stays fresh can help you enjoy it more and avoid waste.
For storing your dessert, the fridge is your best friend. Here are some must-follow tips:
- Always cover the dessert with plastic wrap or aluminum foil
- Store in the coldest part of your refrigerator
- Keep at a consistent temperature between 36-40°F
If stored correctly, your cherry cheesecake lush will stay fresh for 4-5 days. It tastes best in the first 2-3 days after making it.
"Refrigeration is the secret to preserving your dessert's delightful taste and creamy consistency."
If you want to keep it longer, freezing is an option. Wrap it well in plastic wrap and put it in a sealed container. It can be frozen for up to 1-2 months, keeping its quality.
- Thaw frozen dessert in the refrigerator overnight
- Consume within 24 hours of thawing
- Do not refreeze after thawing
Pro tip: If you notice any changes in texture or smell, discard the dessert to ensure food safety.
Customization and Variations
Making your Cherry Cheesecake Lush special is simple. There are many ways to make this classic dessert your own.
Start by trying different fruit fillings. Cherry is popular, but you can also use:
- Blueberry pie filling for a vibrant blue-tinted dessert
- Peach filling for a summery twist
- Strawberry topping for a classic red variation
- Mixed berry combination for complex flavor profiles
Change up your crust, too. Here are some ideas:
- Swap golden Oreos for chocolate sandwich cookies
- Use graham crackers for a traditional cheesecake base
- Mix in crushed nuts for added texture
- Try shortbread cookies for a buttery foundation
"Creativity is the secret ingredient in any memorable dessert!" - Pastry Chef Recommendation
Top your dessert with exciting toppings. They add flavor and look great:
- Sprinkle chopped pecans or walnuts
- Drizzle chocolate sauce
- Add toasted coconut flakes
- Dust with powdered sugar
- Garnish with fresh fruit slices
Remember, making your dessert special is all about being creative. Don't be afraid to try new things and make it your own!
Conclusion
Your Cherry Cheesecake Lush is a top pick for an easy dessert. It turns simple ingredients into a show-stopping treat. This no-bake cheesecake is easy to make and tastes fantastic, perfect for anyone.
This dessert is super versatile. You can change the filling to blueberry or strawberry, make it gluten-free, or add almond extract for a unique taste. Each change brings a new twist to the classic.
Want to wow your family and friends? This Cherry Cheesecake Lush is your go-to. It's made with just a few ingredients and is quick to prepare. Serve it cold, add some fresh mint or chocolate, and your guests will be impressed.
Remember, patience is key for a perfect no-bake cheesecake. Let it chill for at least two hours. This way, the flavors will blend, and the texture will be just right. You'll get a creamy, delicious dessert that's a must-have in your collection.
FAQ
What makes Cherry Cheesecake Lush different from traditional cheesecake?
Cherry Cheesecake Lush is a no-bake dessert, so you don't need an oven. It has layers and a light, refreshing texture, making it great for parties and summer events.
Can I make this dessert ahead of time?
Yes, you can! Cherry Cheesecake Lush is perfect for making ahead. Just prepare it 1-2 days before and keep it in the fridge. This lets the flavors mix and taste even better.
Are there alternatives to cherry topping?
Absolutely! You can change the topping to strawberries, blueberries, raspberries, or mixed berries. You can also use canned pie fillings or fresh fruits. It's all up to your taste.
How long will Cherry Cheesecake Lush keep in the refrigerator?
If covered well, it stays fresh for 3-5 days in the fridge. An airtight container keeps it fresh and prevents odors.
Is this dessert suitable for people with dietary restrictions?
Yes, you can adapt it to fit different diets. Use low-fat cream cheese and sugar-free pudding mix, or try dairy-free options for special diets.
Can I freeze Cherry Cheesecake Lush?
Yes, it freezes well for up to 2 weeks. Wrap it in plastic wrap and foil. Thaw it in the fridge overnight. Then, add fresh fruit for the best taste and texture.
What type of crust works best for this dessert?
Graham cracker crust is the classic choice, but you can also use vanilla wafer cookies, shortbread, or crushed pretzels. It's all about preference.
Print
Cherry Cheesecake Lush
- Total Time: 20 minutes + chilling time
- Yield: 12 servings 1x
- Diet: Vegetarian
Description
This Cherry Cheesecake Lush is a creamy, dreamy, layered dessert featuring a buttery crust, smooth cheesecake filling, and a luscious cherry topping. Perfect for potlucks, parties, or any sweet craving!
Ingredients
- 🥮 For the crust:
- 1 ½ cups graham cracker crumbs
- ⅓ cup melted butter
- 2 tablespoons granulated sugar
- 🧀 For the cheesecake layer:
- 8 ounces cream cheese, softened
- ½ cup powdered sugar
- 1 teaspoon vanilla extract
- 1 ½ cups whipped topping (or heavy cream, whipped)
- 🍒 For the cherry layer:
- 1 can (21 ounces) cherry pie filling
- 🍶 For the whipped topping layer:
- 1 ½ cups whipped topping
Instructions
- 🥮 Prepare the crust: In a bowl, combine graham cracker crumbs, melted butter, and sugar. Press the mixture into the bottom of a 9x13-inch dish. Chill in the refrigerator for 15 minutes.
- 🧀 Make the cheesecake layer: Beat cream cheese, powdered sugar, and vanilla until smooth. Fold in whipped topping until fully combined. Spread evenly over the chilled crust.
- 🍒 Add the cherry layer: Spread the cherry pie filling evenly over the cheesecake layer.
- 🍶 Top with whipped cream: Spread the remaining whipped topping over the cherry layer for the final lush layer.
- ❄️ Chill and serve: Refrigerate for at least 4 hours or overnight to set. Slice into squares and serve!
Notes
- Swap the cherry pie filling with blueberry, strawberry, or mixed berry for variety.
- Add chopped nuts or chocolate shavings on top for extra texture.
- Store leftovers in the refrigerator for up to 3 days.
- Prep Time: 20 minutes
- Cook Time: None
- Category: Desserts
- Method: No Bake
- Cuisine: American

Leave a Reply